

Learn To Skibike
Safety and proper technique are essential to ensuring an enjoyable skibiking experience. While online resources can provide general guidance, they cannot replace hands-on instruction, real-time feedback, and expert advice on equipment, terrain navigation, and best practices.
Working with a certified instructor or experienced guide will help you build confidence, master essential skills, and ride with greater control.
We encourage all riders—beginners and experienced skibikers alike—to prioritize safety, take a lesson, and familiarize themselves with responsible riding techniques. Explore our beginner’s guide to skibiking for expert tips on equipment, riding strategies, and mountain safety. See you on the slopes!

Skibike Lesson Guide Pocketbook
-
Your Person
Base Layer (long johns or thermal wear) | Mid Layer (liners for pants/jacket, hoody, gaiter, neck warmer, etc.)
Outer Layer (snow pants, winter coat)
Good Pair of Winter Socks | Winter Gloves
Boots | Goggles | Helmet
Ski Pass | Phone | Radio
Snacks/water
Tools
Your Bike
Skis (tuned, waxed)
Leash? *if required
Bolt Check (rear ski bolts, rear axel, rear shock bolts, seat post, saddle, pegs/pedals, bars, stem, front retention system, front axels (fork and adapter), front ski bolts)
Bike bag if you have one (tools, snacks, water)
-
While some may start on a magic carpet, most will need to take a chairlift. Here’s what you need to know:
Ask for Assistance – Lift attendants can slow the chair for easier loading/unloading. To request a slow-down at the top, signal with a downward hand motion. It’s better to have the lift slowed than to drop your bike.
Your Bike Counts as a Rider – On a two-person chair, you ride alone. On a four-person chair, two skibikes max.
No Lowering the Bar – If skiing/snowboarding passengers join you, inform them before boarding that the safety bar cannot be lowered. Some mountains require front-loading, which differs from our method—we'll provide resources on this soon.
Check Leash Laws – Some resorts require a leash while riding the lift or even on the bike itself. If needed, attach it before reaching the front of the line.
-
SNO-GO: Their "Learning Hub" offers comprehensive resources for beginners, including FAQs and tutorials to get started with ski biking. SNO-GO Ski Bikes
Lenz Sport: They feature instructional content such as "How to Ski Bike – First Five Runs," aimed at guiding new riders through their initial experiences on the slopes. lenzsport.com
Brenter Snowbike: Their "Learn to Ride" section provides step-by-step instructions and emphasizes the ease of learning to ride their snowbikes. Brenter Snowbike®
Additionally, some ski resorts that offer ski bike rentals include tutorial videos on their websites to familiarize potential users with the basics before they arrive. New England Ski Journal
-
Description text goes here
Loading & Unloading the Chairlift or Gondola
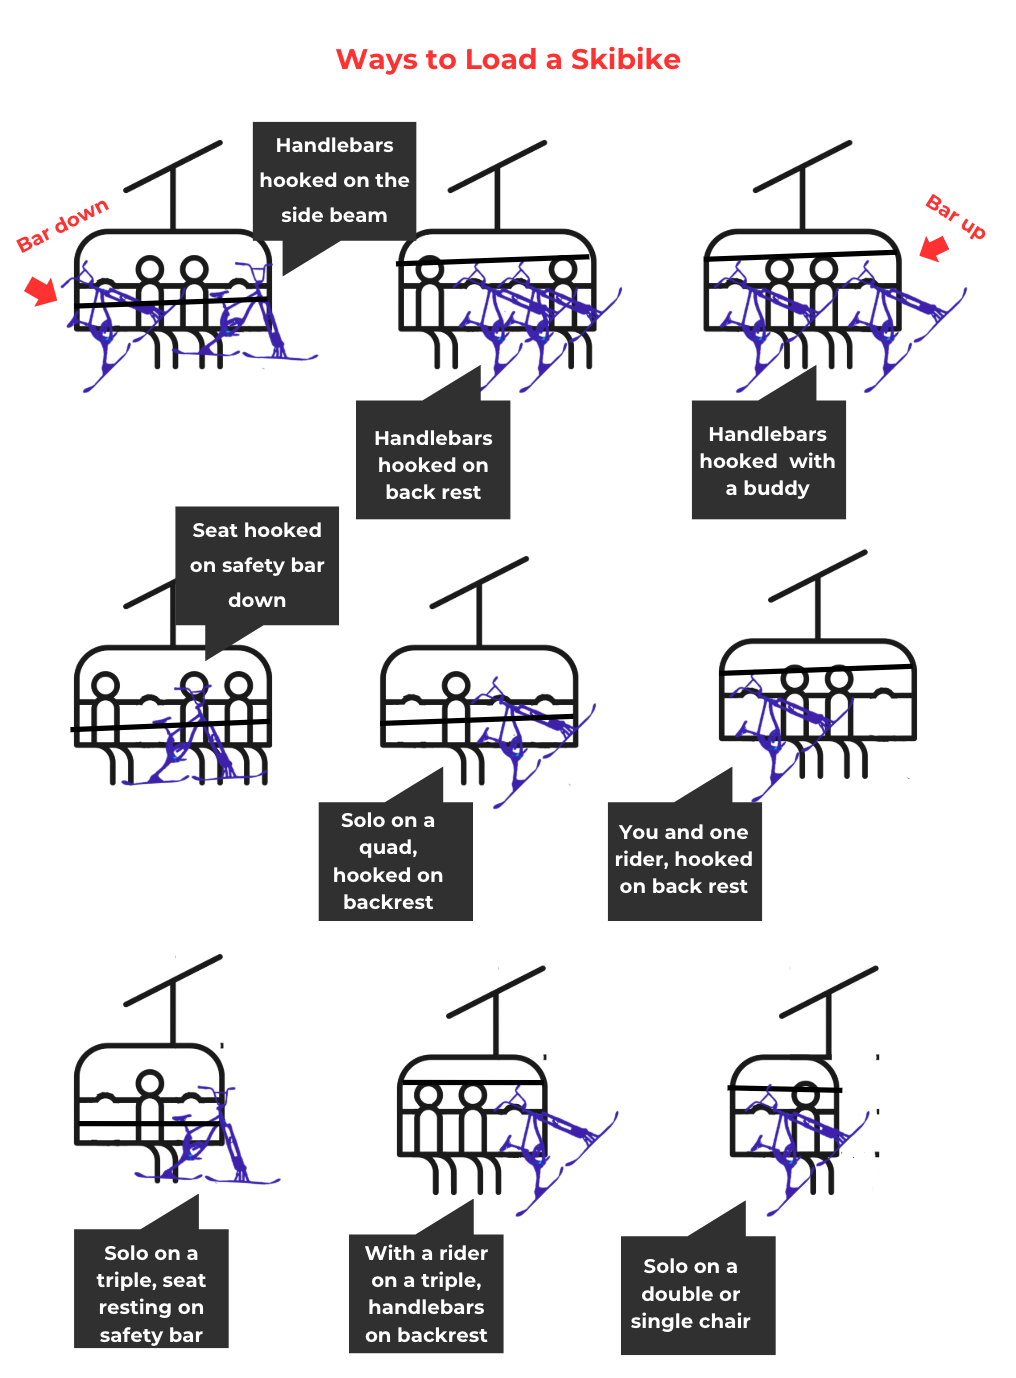
LOAD CHAIRLIFT
Some skibikes sit vertically next to you on the chair. You can position it on either side based on preference. At the loading line, stand with your bike beside you, foot pegs over the line, and grab the top tube with one hand. As the chairlift approaches, you sit down, and lift the bike so the Secure-Rest contacts the front of the seat. Use your inner leg to stabilize it by placing it under the closest foot peg. Once the rear ski clears the platform, rotate the bike backward toward the chair’s backrest using the Secure-Rest as a pivot. Slide it back fully—it’s normal for the front ski/handlebar to rotate 90°, often hooking behind the seat. After securing the bike, hold onto a foot peg or frame for stability. Now, sit back and enjoy the ride!
Some bikes can be loaded between your legs, (usually if riding with the bar down), and some bikes are self-loading (you do not get off the bike). As the chairlift approaches, let the bike seat rest on the chairlift, and sit back with one hand on the center tube or bike seat. When your skis lift off the platform, lower the safety-bar, securing it under your bike seat. You can use you foot pegs to help lift the bike seat around the safety bar.
LOAD GONDOLA
If you are riding in a gondola, you will walk in carrying your bike next to you. Once inside, you will need to turn your front ski/handlebar 90 degrees to shorten the “wheel base”. This will allow you to leave the bike standing up as if it were on the ground yet fit inside the gondola. It should also allow enough room for another bike to fit. Should you be with another bike, the second person to get in will enter in the same manner as the first person and set their bike right next to the first one. Both people will then be able to sit on the bench and enjoy the ride up.
UNLOADING
If you need the chair slowed down, signal the lift attendant with a repetitive downward hand motion.
About 2-3 lift poles before the top, prepare to unload:
If the front ski rotated, turn it back so the tip points up.
Ensure the handlebar is free from the chair frame.
Hold the top tube with one hand and the seat, handlebar, or foot peg with the other.
Slightly rotate the front ski downward, keeping the Secure-Rest against the seat.
At the unloading platform:
Let the rear ski touch down first.
Walk off or ride while lowering the front ski to the snow.
Move to a safe area away from the unloading zone.
For gondolas, simply reverse the entry process—rear ski exits first, then rotate the front ski forward to roll out smoothly.
Basics- Body Position & Balance (Type II Skibike)

Proper Body Position (Attack Position):
Stand on the foot pegs with knees bent, weight forward on the balls of your feet, arms bent, and head up. The key is to ensure you can see the front of the head tube and avoid straight legs or arms. Proper position keeps you balanced, helping you control the bike.
Why Body Position Matters:
Weight should be forward over the front ski to guide the back ski. Leaning too far back can cause poor control, while leaning forward keeps you in control, like a front-wheel-drive vehicle. Maintaining this position is crucial for turning and speed control.
Finding Your Edges:
Start by keeping weight forward and learning to ride on the uphill edge. To stop, point your front ski uphill and hold it there until you stop. Avoid putting feet down to stop (Flintstoning), as it can cause injury. Practice turning before you need to and focus on where you want to go. Repeat the exercise until you’re comfortable with your edges, body position, and speed control.
The Flat Skidded Traverse
This safety maneuver is for when you're on a more advanced run. Unlike the edge control from the previous step, this skill involves traversing the slope at an angle while still crossing from side to side.
Body Position:
Maintain the same "attack position" as before: weight forward, knees bent, elbows bent, head up. Keep your speed under control by leaning forward, and stop by turning your front ski uphill.
The Skill:
To master this skill, shift your weight from the uphill to the downhill foot peg while pushing down on the downhill handlebar. This flattens the front ski, allowing it to slide on its base. Find the right balance by adjusting weight distribution to get the back ski to slide. If the back ski doesn’t slide, put more weight on the downhill peg, but be cautious not to put too much weight and risk a "high side."
Stopping:
To stop, turn your front ski uphill, and start your turn early if you have more speed. Commit to the turn, force it if needed by adjusting your elbows, and stop. Your track should be wide and angled, unlike the narrow edging track.

Learn-To-Turn & Bike Control

Garland Turns teach connected turns with downhill progression. They combine what you’ve learned about edge control and ski flattening while introducing the concept of turning down the slope. The key is to maintain forward body weight to control speed.
The Skill:
Start by slightly pointing the front ski downhill to gain speed. Initiate the turn by turning the handlebar and commit to completing the turn. As you turn, your skis will transition from base to edge. After completing the turn, turn the handlebar back to go downhill and repeat. Look for a garland pattern in your tracks.
The 180-degree turn & Stop
The 180-degree turn is a progression from Garland Turns, involving a full turn with downhill movement. The goal is to control speed and make smooth 180-degree turns, facing the opposite direction after each one. This skill builds on Garland Turns by requiring more speed control and body positioning.
The Skill:
Start with a smooth traverse across the run. Commit to a full 180-degree turn, leaning forward and maintaining an even weight distribution. Use your arms to either push or pull the handlebar to complete the turn. Once you complete the turn, reset and repeat, adjusting the tightness of each turn by shifting weight or being more aggressive with the handlebar.

Once comfortable, begin to shift weight to the downhill peg to increase speed or the uphill peg to make the back ski slide more. Focus on maintaining smooth, connected turns with controlled speed.
Downhill Turns & Weight Transfer

The Fall Line
Side-sliding down the fall line is one of the hardest but most crucial skills for safety. It helps you navigate difficult situations, such as steep, icy terrain, or when you need to assist someone below you. If you find yourself unable to safely turn, side-sliding provides a controlled way to descend.
The skill is challenging because it requires balance. Unlike the flat skidded traverse, you'll be sliding straight down with minimal forward or backward movement, balancing between your edges and bases. Your body weight should stay neutral: lean forward to move, lean back to stop, and avoid too much weight on the downhill side to prevent high-siding. When done correctly, your track should show a controlled slide down the fall line.
This technique is key when you're outside your comfort zone and need a safe way to descend.
By now, you've learned essential skills: chairlift loading, proper body position, edging, speed control, garland turns, and 180-degree turns. Now, let's progress to downhill turns and weight transfer, combining everything learned so far.
As you begin downhill turns, it’s natural to lean back, but you must fight this instinct to maintain control. Transfer weight through your foot pegs while leaning into the turn to control speed and ensure smooth turns. Drive weight through the uphill foot peg while leading with the downhill hip, similar to a hockey player making a hip check. This motion will allow the rear ski to slide through the turn.
Start by initiating turns with the handlebar, then shift weight to the uphill foot peg while leaning in to the slope. As you make the turn, your track should look like a garland pattern, with the rear ski skidding beneath you. Practice in one direction, then reverse.
For downhill turns, point your front ski at a 45-degree angle across the run. Initiate the turn with the handlebar and keep turning downhill, using weight transfer to help the bike slide through. Adjust the tightness of your turns by leaning more or less into the turn and adjusting the handlebar. Repeat until comfortable with connected downhill turns.
Once comfortable, move to weight and foot transfer.
Mastering Skibike Turns: From Sliding to Carving

Congratulations! By now, you should confidently ride a skibike and have mastered key skills like body position, edging, and various turning techniques. Now it's time to combine everything into two main types of turns: Fish Tail Sliding Turns and Carving Turns.
Fish Tail Sliding Turns: These turns are quick and tight, primarily relying on weight transfer and foot movement rather than heavy handlebar input. The turns are made on the bases of the skis, not the edges. To perform them, lean forward and use your feet and body weight to slide the bike through the turn, leading with your hips. You’ll create a rhythm, similar to a dance or mountain biking on a pump track.
Carving Turns: Carving is done on the edges of the skis, allowing for larger, smoother turns at higher speeds. These turns are more like those of Super-G ski racers. For a carving turn, lower your center of gravity by crouching into your attack position, and rely more on handlebar input with some weight transfer to maintain control. Carving turns make narrower tracks and allow you to maintain high speed.
With practice, you’ll effortlessly switch between these two turn types, gaining confidence and control on your skibike.

Disclaimer
The information provided on this "Learn to Skibike" page is for general educational purposes only and is intended to help riders understand the basics of skibiking. Some of the materials, techniques, and guidelines featured on this page are sourced from skibike manufacturers, instructors, and industry professionals. While we strive to provide accurate and up-to-date information, the American Skibike Association (ASA) does not endorse any specific brand, product, or training method.
Skibiking involves inherent risks, and we strongly encourage riders to follow all resort rules, wear appropriate safety gear, and seek professional instruction before attempting to ride. Always consult with qualified instructors or resort personnel to ensure a safe and enjoyable experience on the slopes.
By using this page, you acknowledge that the ASA is not liable for any injuries, accidents, or damages resulting from the use of the information provided. Ride responsibly and enjoy the slopes!